Sunday, January 26, 2014

MySQL database access using Python in Raspberry Pi

          While working with Python in Raspberry Pi it might be useful to have a database access for your application or somewher it is required.Or may be as a beginner you would like to use MySQL with Python.Here i have compiled a post on how to use MySQL with Python...
   
            First of all you have to install python-MySQLdb which interacts between the My-SQL database and the Python.So to install it in the Raspberry-Pi terminal type..

          sudo apt-get install python-mysqldb


I have already installed so my screenshot is looking like this..after installing this nothing else is required..

Move to the desktop and open the Python IDLE.Remember don't open the IDLE 3 as it doesn't supports the MySQLdb.


Now in the prompt type
          
 import MySQLdb

if it shows some error then the MySQLdb is not installed.If it is installed then it will show nothing.In the IDLE click on File and New Window this will open a new editor to write the python codes.
Editor...

Now lets you have a database dbase and user is root and PWD is pwd and has a table tab and some stored data.Here is my database snap...


          Now in the editor write the following code and save it by pressing ctrl+s and execute it by pressing F5.It will show you the results in the IDLE shell.

Code:

import MySQLdb=MySQLdb.connect("localhost","user","password","database")
curs=db.cursor()
#tab is a table in the database 
curs.execute("SELECT * FROM tab")
for reading in curs.fetchall():
   print str(reading [0])
db.close()


Thursday, January 23, 2014

Image Gallery using JAVA and JAVAFX

          I quite browsed internet a lot to find something to create a image gallery in JAVA but i got null out of it.So i started making my own gallery in JAVA and JAVAFX and also integrated SQL database with it so that i can keep the information about the images and my gallery can be searchable according to persons in the image or place or date taken etc.Here below i am providing the codes to make the gallery..My gallery looks like this :
 
     So first of all create the following database in your local database.I suppose you are using My-SQL and phpmyadmin(comes in XAMPP) .After creating the DB now comes the coding..


  Code to add new folders to your database and view the images..

import javafx.scene.effect.*;

import java.awt.Color;
import java.awt.Dimension;
import java.awt.event.MouseAdapter;
import java.awt.event.MouseEvent;
import java.io.File;
import java.sql.Connection;
import java.sql.DriverManager;
import java.sql.ResultSet;
import java.util.ArrayList;
import java.util.Arrays;
import java.util.Random;

import javafx.application.Platform;
import javafx.embed.swing.JFXPanel;
import javafx.scene.Group;
import javafx.scene.Scene;
import javafx.scene.image.Image;
import javafx.scene.image.ImageView;
import javafx.scene.layout.HBox;

import javax.swing.JFrame;
import javax.swing.JLabel;
import javax.swing.JOptionPane;

import com.oksbwn.ErrorHandling.handleExceptions;
public class AddNewGallery 
  {
    static Dimension gh=java.awt.Toolkit.getDefaultToolkit().getScreenSize();
    static int x=gh.width;
 static int y=gh.height;
    Random randomGenerator = new Random();
    static JFrame jFrame = new JFrame("- JFrame -");
   
    public static void main(String[] args)
     {
     new AddNewGallery();
     }

    public AddNewGallery()
      {
     jFrame.setLayout(null);
      jFrame.setUndecorated(true);
     jFrame.setBackground(new Color(Color.white.getRed(), Color.white.getGreen(),Color.white.getBlue(),50));
     jFrame.setType(javax.swing.JFrame.Type.UTILITY);
      jFrame.setBounds(0,0,x,y);
      final  JLabel cloesButton = new JLabel("X");
       cloesButton.setForeground(Color.red);
       cloesButton.addMouseListener(new MouseAdapter() {
        @Override
        public void mouseClicked(MouseEvent arg0) {
         jFrame.dispose();
          }});
       cloesButton.setBounds(jFrame.getWidth()-30,5, 15,15);
     jFrame.getContentPane().add(cloesButton);
     
     final  JLabel AgainButton = new JLabel("A");
      AgainButton.setForeground(Color.green);
      AgainButton.addMouseListener(new MouseAdapter() {
        @Override
        public void mouseClicked(MouseEvent arg0) {
         jFrame.dispose();
         new AddNewGallery();
          }});
      AgainButton.setBounds(jFrame.getWidth()-60,5, 15,15);
     jFrame.getContentPane().add(AgainButton);
      
      
      final JFXPanel jFXPanel3 = getPanel("");  
       jFrame.setVisible(true);
       //final String actPath="E://Image_Gallery#oksbwn//16.02.20111//";
      final String actPath=JOptionPane.showInputDialog(null, "Folder", "E://Image_Gallery#oksbwn//16.02.20111//");
       
    //File f = new File("C:\\Users\\oksbwn\\Pictures\\");
     File f = new File(actPath);
    final ArrayList names = new ArrayList(Arrays.asList(f.list()));
       Platform.setImplicitExit(false);
       Platform.runLater(new Runnable(){
            @Override
            public void run() {
               try {
     Class.forName("com.mysql.jdbc.Driver");
     Connection con1=DriverManager.getConnection("jdbc:mysql://localhost:3306/bikash","root","");
            initFxLater(jFXPanel3,"");
                 for(String file : names)
                 {
              initFxLater(getPanel(actPath+file),actPath+file);
              ResultSet res= con1.prepareStatement("SELECT * FROM `image_gallery` WHERE `Path` LIKE '"+actPath.substring(2, actPath.length())+file+"'").executeQuery();
                if(!res.next()) 
                 {
                 con1.prepareStatement("INSERT INTO `image_gallery` (`Sl_No`, `Image`, `Path`, `Persons`,`About`,`Date`,`Place`) VALUES (NULL, '"+file+"', '"+actPath.substring(2, actPath.length())+file+"','','','','')").execute();
                  } 
               }
                 con1.close();
                 } catch (Exception e) {new handleExceptions(e);}
              
                   }
        });
    }


//****************************************************************************************************************************//
private  void initFxLater(JFXPanel panel,String path)
{
  File file = new File(path);
  Image image = new Image(file.toURI().toString(),100,100,true,true);
  DropShadow ds1 = new DropShadow();
  ds1.setOffsetY(4.0f);
  ds1.setOffsetX(4.0f);
   
    final ImageView  chart = new ImageView();
    chart.setImage(image);
    chart.setEffect(ds1);
    Group root = new Group();
    Scene scene = new Scene(root);
    HBox box = new HBox();
       
    box.getChildren().add(chart);
    root.getChildren().add(box);
    scene.setFill(null);
    panel.setScene(scene);
}
private JFXPanel getPanel(String path)
{  
    final  JFXPanel jFXPanel = new JFXPanel();
 jFXPanel.setOpaque(false);
    jFXPanel.setBounds(randomGenerator.nextInt(x-120),randomGenerator.nextInt(y-120),110,110);
    jFXPanel .addMouseListener(setPos(jFXPanel,path));
    jFXPanel.addMouseMotionListener(setPos(jFXPanel,path));
    jFrame.getContentPane().add(jFXPanel);
 return jFXPanel;
 }
private MouseAdapter setPos(final JFXPanel comp,final String path){
final  MouseAdapter mouseListener2 = new MouseAdapter() {
    int x, y;
    @Override
    public void mousePressed(MouseEvent e) {
        if (e.getButton() == MouseEvent.BUTTON1) {
            x = e.getX();
            y = e.getY();
        }
    }
    @Override
    public void mouseClicked(MouseEvent e) {
      //  System.out.println(path)
     new FullImage(path);
    }

    @Override
    public void mouseDragged(MouseEvent e) {
        if ((e.getModifiersEx() & MouseEvent.BUTTON1_DOWN_MASK) != 0) {
         comp.setLocation(e.getXOnScreen() - x, e.getYOnScreen() - y);
        }
    }
  };
return mouseListener2;
}

}

    Now it will ah to ask for the path  to image folder so after providing the path and other details it will show you the images so are in thumbnails.To see the large image when clicked over the thumbnails i used the following code :

import java.awt.Color;
import java.awt.Dimension;
import java.awt.event.MouseAdapter;
import java.awt.event.MouseEvent;
import java.io.File;
import java.sql.Connection;
import java.sql.DriverManager;
import java.sql.ResultSet;

import javafx.application.Platform;
import javafx.embed.swing.JFXPanel;
import javafx.scene.Group;
import javafx.scene.Scene;
import javafx.scene.effect.DropShadow;
import javafx.scene.image.Image;
import javafx.scene.image.ImageView;
import javafx.scene.layout.HBox;

import javax.swing.JFrame;
import javax.swing.JLabel;
import javax.swing.JOptionPane;

import com.oksbwn.ErrorHandling.handleExceptions;
import com.oksbwn.popUp.popMe;
import com.oksbwn.voiceEnable.Voice;


public class FullImage {
     JFrame jFrame = new JFrame("- JFrame -");
String path2;

     final  JFXPanel jFXPanel = new JFXPanel();
  
     static Dimension gh=java.awt.Toolkit.getDefaultToolkit().getScreenSize();
     static int x=gh.width;
  static int y=gh.height;
    public FullImage(final String path)
      {

      path2=path;
     jFrame.setLayout(null);
      jFrame.setUndecorated(true);
     jFrame.setBackground(new Color(Color.white.getRed(), Color.white.getGreen(),Color.white.getBlue(),50));
     jFrame.setType(javax.swing.JFrame.Type.UTILITY);
      jFrame.setBounds(0,0,x,y );
      jFrame .addMouseListener(mouseListener2);
      jFrame.addMouseMotionListener(mouseListener2);
      
      final  JLabel cloesButton = new JLabel("CLOSE");
       cloesButton.setForeground(Color.green);
       cloesButton.addMouseListener(new MouseAdapter() {
        @Override
        public void mouseClicked(MouseEvent arg0) {
         jFrame.dispose();
          }});
       cloesButton.setBounds(jFrame.getWidth()-40,5,35,25);
     jFrame.getContentPane().add(cloesButton);
     jFXPanel.setOpaque(false);
      jFXPanel.setBounds(0,0,x,y);

      jFXPanel .addMouseListener(mouseListener2);
      jFXPanel.addMouseMotionListener(mouseListener2);
      jFrame.getContentPane().add(jFXPanel);
      
       jFrame.setVisible(true);
      Platform.setImplicitExit(false);
       Platform.runLater(new Runnable(){
            @Override
            public void run() {
               initFxLater(jFXPanel,path);
              }
        });
    }


//****************************************************************************************************************************//
private  void initFxLater(JFXPanel panel,String path)
{
  File file = new File(path);
  Image image = new Image(file.toURI().toString(),x-10,y-10,true,true);
  DropShadow ds1 = new DropShadow();
  ds1.setOffsetY(4.0f);
  ds1.setOffsetX(4.0f);
   
    final ImageView  chart = new ImageView();
    chart.setImage(image);
    chart.setEffect(ds1);
    Group root = new Group();
    Scene scene = new Scene(root);
    HBox box = new HBox();
       
    box.getChildren().add(chart);
    root.getChildren().add(box);
    scene.setFill(null);
    panel.setScene(scene);
}
final  MouseAdapter mouseListener2 = new MouseAdapter() {
    int x, y;
    @Override
    public void mousePressed(MouseEvent e) {
        if (e.getButton() == MouseEvent.BUTTON1) {
            x = e.getX();
            y = e.getY();
        }
    }
    @Override
    public void mouseDragged(MouseEvent e) {
        if ((e.getModifiersEx() & MouseEvent.BUTTON1_DOWN_MASK) != 0) {
         jFXPanel.setLocation(e.getXOnScreen() - x, e.getYOnScreen() - y);
        }
    }
    
   
    @Override
    public void mouseClicked(MouseEvent e) {
     try{
      Class.forName("com.mysql.jdbc.Driver");
      
   Connection con1=DriverManager.getConnection("jdbc:mysql://localhost:3306/bikash","root","");
         ResultSet res= con1.prepareStatement("SELECT * FROM `image_gallery` WHERE `Path` LIKE '"+path2.substring(2, path2.length())+"'").executeQuery();
          if(res.next())
           {
           new Voice("Sir this image is of   "+res.getString(4)+"at   "+res.getString(7)+"    in "+res.getString(6)+"    captured cooment is "+res.getString(5));
             new popMe("Image of "+res.getString(4)+"at "+res.getString(7)+" in "+res.getString(6)+" cooment: "+res.getString(5), "Image Gallery","ok",10,140);
           if(res.getString(5).isEmpty()){
     String Persons=  JOptionPane.showInputDialog("Persons in Photo:");
     //String About =JOptionPane.showInputDialog("");
     String About =JOptionPane.showInputDialog("About the Photo");
     String Date= JOptionPane.showInputDialog("Date:");
     String Place= JOptionPane.showInputDialog("Where:");
            con1.prepareStatement("UPDATE `image_gallery` SET `Persons`='"+Persons+"',`About`='"+About+"',`Date`='"+Date+"',`Place`='"+Place+"' WHERE `Path` LIKE '"+path2.substring(2, path2.length())+"'").executeUpdate();
                
              }
           } 
       con1.close();
       } catch (Exception e1) {new handleExceptions(e1);}}
  };
}
You would normall see some eroors as i have used some self defined functions...So just edit those and modify the codes according to the usage.... Hope it would help you........For queries leave a comment...

Wednesday, January 15, 2014

Setting up apache webserver in Raspberry PI

     You might be interested in running a PI as your web server  for your network  as the tiny device doesn't consume more power as compared to a full PC.Here are the steps followed.

 install Apache by providing command 


  sudo apt-get install apache2 apache2-utils 

 You will be asked to download press y.

 
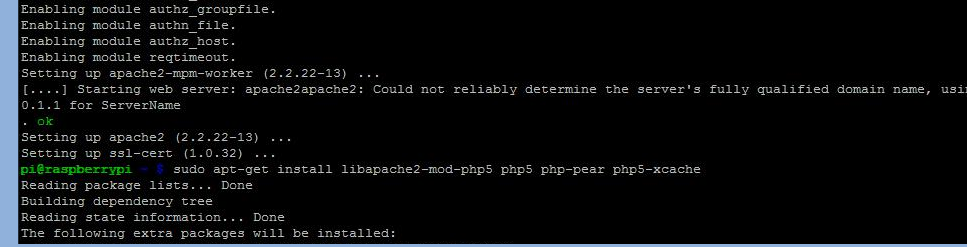
 After the completion of installation of Apache now install  php.The pi  supports php5 so install it by

  
   sudo apt-get install  libapache2-mod-php5 php5 php-pear php5-xcache

same preess  Y to download packages when asked


nest is to install MySQL as the server might require a database for usage .Type 

 
   sudo apt-get install php5-mysql mysql-server mysql-client


Now you will be asked to enter the root user password enter a password.


Now retype the password when prompted..


This completes the installation of My-SQL ,As database is installed installing phpmyadmin is a good thing to manage the database..So to install phpmyadmin type

       
   sudo apt-get install phpmyadmin


Now when prompted choose the installed server and hit ok


When prompted give the password for application and then for root user..


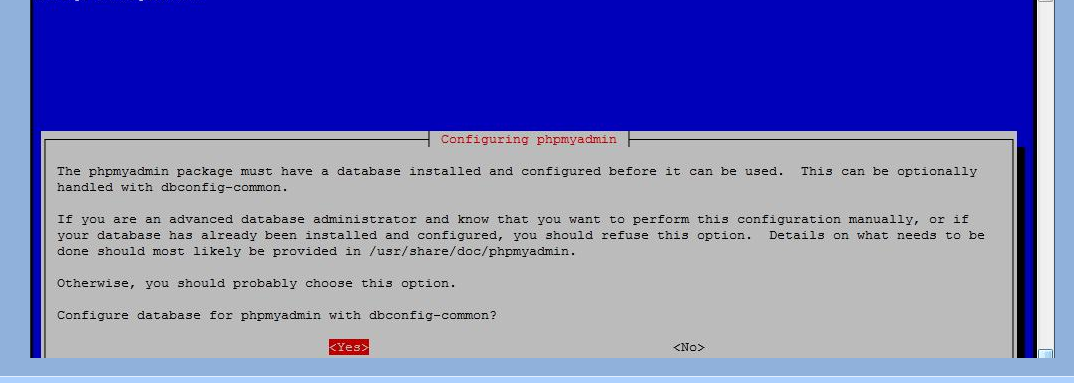
Choose Yes for configure phpmyadmin and proceed


Now you have to edit the apache to use the phpmyadmin so type
  
   
   sudo nano /etc/apache2/apache2.conf


move to the end of file by continuously pressing ctrl+V and at the end add the following line

   
   Include /etc/phpmyadmin/apache.conf 


Now everything is ready for the server ,so reboot the pi..


you can test the server at the PI's IP and phpmyadmin at IP/phpmyadmin


thanks..


Monday, January 13, 2014

Remote login to Raspberry Pi Desktop

  Remote log in is the concept where you can log in to other PC by using the IP address of the device and use the resources of it.In case of Pi it comes handy when you want to operate your Pi without monitor or say you don't have it.I will show how to use putty and Xming to interact with the raspberry pi desktop.First download the required software as shown below..


Install the Xming and run putty.But before this we have to enable SSH in the Raspberry Pi ,To enable SSH from Raspberry Pi prompt type

   
 sudo raspi-config


it will show a window like this ,goto advanced options


Click on SSH which will show you a window like this now hit enter over Enable.
 

It's all done from Pi,now get the IP address of the Pi using ifconfig  and note doen the Ip.Now run putty Enter the IP of Pi in  IP address field andd 22 in port.


 click over right  hand menu on SSh and click x11 and set x-display location to localhost:0


Again click on session menu and save the settings by providing a  name , so that you can use it later.And hit open button.

 This will open a prompt and show some warning press yes and it will ask for login as give the username and later pwrd when asked .This is the terminal of the PI.If you are interested in desktop view type command ,

       
 pcmanfm 


That's all enjoy................

Booting Raspberry Pi from USB Flash Drive

      Loading OS over SD card is ok but it is not that faster and also have limited read/write cycles so one might look for USB Flash drive to load the OS and is also a cheaper option.It makes the PI little faster.So here i am posting how to boot your Pi from USB drive.

      First write the image file to the USB Drive as int this post(installing-raspbian-over-raspberry-pi).This will write the os to the Drive.Now remove the SD card from the Pi and insert it to the PC , it will show 2 drives open the boot and open the cmdline.txt file


 This file will be containing booth path as shown below image.


 To boot from USB Flash Drive we have to  change the path to dev/sda2.


    Now plug the Drive and SD card to the Raspberry PI and if everything went write it will boot from Flash Now follow the steps listed in this post (installing-raspbian-over-raspberry-pi). And you are ready.You can see while clicking over Expand filesystem it showing not able to expand.Don't worry you need to expand the FS from the command prompt , as shown below.. 

 
     sudo fdisk /dev/sda 

     Then press p and enter to see the partitions. There should only be 2.Make a note of the start position for the partition sda2. Press d and then when prompted type 2 and then hit enter. This will delete the partition.Now we’re going to create a new partition, and make it large enough for the OS to occupy the full space available on the USB Flash Drive. To do this type n to create a new partition, when prompted to give the partition type, press p for primary. Then it will as for a partition number, press 2 and hit enter.You will be asked for a first sector, set this as the start of partition 2 as noted earlier. In my case this as 122880 but this is likely to be different for you.After this it will ask for an end position, hit enter to use the default which is end of disk. Now type w to commit the changes. You will see a message about the Kernel just ignore this. Type the following to reboot:

 
    sudo reboot 
   Once your Raspberry Pi has rebooted, we need to resize the partition. To do this type the following

   
  sudo resize2fs /dev/sda2
 
Once it’s done reboot again. Then type:

   
  df -h 
 
     This will show the partitions and the space, you’ll see the full USB Flash Disk has all the space available now. That’s it, all done!

Installing Raspbian over Raspberry PI (Booting the pi for first time)

   In this post i am going to show how to install a raspbian -wheezy OS over the Raspberry PI and configuring it to have the desktop.This is of course the first time you are going to boot your PI.First of all download the latest version of the OS from the raspberry PI official website.
   
      Now download any image writing software to write the image to the SD card.(I have used the Win32ImageWriter software) and plugin the SD card to the PC.Now select the SD card from the Image writer and also browse the downloaded raspbian OS .img file and click on write.

     
            This is going to take a while and it will show write successful message. It's done.Now plug the card to the PI and supply power to pi the Pi will start booting up and show the boot logs.Then it will show a prompt like this
  
        Hit enter expand Filesytem and click ok. This allows the PI to use all the available space of your SD card.Now to make your PI automatically to desktop mode hit enter over the 3rd option it will show you like this
    
     
     Press enter by selecting the 2nd one.Its all set now press Finish and it will ask to reboot hit ok.Now the Pi will reboot and will take you to the Desktop directly.Now you might update the Pi by using LxTerminal.that's all  .Ypu are ready with your Pi.


Thanks...

Monday, December 30, 2013

Sharing dial-up Internet Connection in Local Network Using Router.


    In this tutorial I am going to show you how to share your dial-up internet connection (like USB dongle,bluetooth modem etc) with other computers or devices present in the network.This comes handy when you have no other internet options for all your devices.You can use a router to share your internet connection through wireless with others.Here are the steps to be followed.

Step-I:
    Configure you router as below.I have taken an IP of 192.168.0.125 but you can take anyone  like 192.168.0.xxx.Set the netmask and IP range and save it.I have used one Netgear router.


  Then configure the connection you want to share as follows.Go to sharing tab and share the connection which looks like this..

 This will pop a dialog saying your LAN IP has been changed click OK and move to the LAN properties and set the IPV4 settings as follows
 
 Its done with your PC now suppose you want to connect to Internet from other PC using Wi-Fi or LAN change the adapter properties of Wi-Fi or LAN (That is you are using to connect) as shown below..


Thats it you have set up the network successfully. You can check it out.


Friday, December 20, 2013

Static IP setup for Raspberry PI

Many time while using Raspberry PI people come across a situation that they have to connect their PI to the Internet through the Local n/ws.Usually a systemis assigned with IPs those are dynamic(DHCP) i.e. any IP is assigned to the device during the connection setup and that's the case for PI also and it works fine also.But in certain cases yo may have to configure your PI with a static IP ,like suppose you want to make your PI a server.Here i have given the steps to add a static IP to your Pi.

   Open the terminal and type
                    cd  /etc/network

then
                    sudo pico interfaces

   Then change the content to this,where you will have to set the corresponding values depending upon your network.

                     auto lo

                     iface lo inet loopback

                     iface eth0 inet static
                                    address  xx.xx.xx.xx

                                    network xx.xx.xx.xx

                                    broadcast xx.xx.xx.xx

                                    gateway xx.xx.xx.xx

press

ctrl+x
 
and then

 y
 
to save and exit.


       Now we have to set the DNS and that is done by esiting the file resolv.conf.So you can edit it by

sudo nano /etc/resolv.conf


and add below shown to the file and save it like before.

nameserver xx.xx.xx.xx
Now reboot your system by giving command

                   
 reboot


That's all you are ready to go.


Friday, December 13, 2013

RX-30 Finger Print Module Device Interfacing

     Many of  you have must heard about the finger print sensor which actually a nice way to provide security.Here  i have given the interfacing of the R30-X finger print sensor module with  ARM LPC2148 board but the basics remains same for all the micro-controllers.

    The first thing for interfacing the sensor with the controller is the handshaking,in which the controller first sends a signal or hex codes to the sensor and it acknowledges .After handshaking only the controller can talk to the sensor.


unsigned char Message[16] = {0XEF,0X01,0XFF,0XFF,0XFF,0XFF,0X01,0X00,0X07,0X13,0X00,0X00,0X00,0X00,0X00,0X1B};

   This line of commands are the first to be sent to the sensor so as to start the communication.I have given the complete code to communicate with the LPC 2148 below.

Code:
#include 
#include "Serial.h"
#include "Utility.h"
#include "LCD4.h"
#include "Glcd.h"

unsigned char Message[16] = {0XEF,0X01,0XFF,0XFF,0XFF,0XFF,0X01,0X00,0X07,0X13,0X00,0X00,0X00,0X00,0X00,0X1B};
unsigned char ack[12]={0X00,0X00,0X00,0X00,0X00,0X00,0X00,0X00,0X00,0X00,0X00,0X00,};
unsigned char gim[12]={0XEF,0X01,0XFF,0XFF,0XFF,0XFF,0X01,0X00,0X03,0X01,0X00,0X05};
unsigned char uim[12]={0XEF,0X01,0XFF,0XFF,0XFF,0XFF,0X01,0X00,0X03,0X0A,0X00,0X0E};
int main (void)
{  int i;
 PINSEL0 = 0;
 PINSEL1 = 0;
 PINSEL2 &= 0x0000000C;
 PINSEL2 |= 0x00000030;
 DelayProc(0.2 * CCLOCK);

  LCD4_init(&IOPIN0, 20/*D4*/, 12/*RS*/, 14/*E*/);
 UART1_init(9600/*bps*/, 15000/*kHz*/,length_8_bit, stop_bit_1, parity_disable, parity_odd);
 UART0_init(9600/*bps*/, 15000/*kHz*/, length_8_bit, stop_bit_1, parity_disable, parity_odd);

 
 for(i=0;i<16;i++)
 {
 UART1_sendchar(Message[i]);
 
 }
    for(i=0;i<12;i++)
 {
    ack[i]=UART1_getchar();
 }
  if(ack[9]==0x00)
{
UART0_sendstring("password checked sucessfully\n\n");
LCD4_sendstr (0,2, "password checked sucessfully");
} 
  label:
    for(i=0;i<12;i++)
 {
 UART1_sendchar(gim[i]);
 
 }
 for(i=0;i<12;i++)
 {
    ack[i]=UART1_getchar();
 } 

  if(ack[9]==0x02)
{
UART0_sendstring("cant find finger\n\n");
LCD4_sendstr (0,1, "cant find finger");
DelayProc(.7 * CCLOCK);
LCD4_sendstr (0,1, "Put finger");
UART0_sendstring("Put finger\n\n");
DelayProc(.7* CCLOCK);
goto label;

}
if(ack[9]==0x00)
{
UART0_sendstring("finger scan sucessfully completed\n\n");
LCD4_sendstr (0,1, "finger scan sucessfully completed");
}

 for(i=0;i<12;i++)
 {
 UART1_sendchar(uim[i]);
 
 }
 for(i=0;i<40000;i++)
 {
    UART0_sendchar(UART1_getchar());
 } 


      LCD4_sendstr (0,1, "image downloaded");

}

Thursday, December 12, 2013

We are Dreamers

  We are the dreamers
             We are the dreamers
                                      with a dream of flying high,
     We try to touch the sky,
                                    And go to a boundless world.
            We believe in what we are,
                                  We do what we can.
             Nothing can stop us,
                                   because we are the dreamers.
              Our dream is to built an INDIA,
                                                  which world will know.
              We tempted to achieve our goal,
                                                   And eager to score it.
               Everybody will know us,
                                                   because we are the dreamers.
              We dream to reach beyond the universe,
                                                  To the house of stars.
              We and our knowledge,
                                                that will make our dream true.
     We never stops,
                                              because we are the dreamers.

Simple currency converter in JAVA

Here goes a simple JAVA code to convert rupees by using the online yahoo exchange rates.

Code:


package com.oksbwn.currencyRate;
import java.io.IOException;

import javax.swing.JOptionPane;

import org.apache.http.client.HttpClient;
import org.apache.http.client.ResponseHandler;
import org.apache.http.client.methods.HttpGet;
import org.apache.http.impl.client.*;

import com.oksbwn.popUp.popMe;

public class YahooCurrencyConverter
{ 
@SuppressWarnings({ "deprecation", "resource" })
public float convert(String currencyFrom, String currencyTo) throws IOException
 {  
    HttpClient httpclient = new DefaultHttpClient();  
 HttpGet httpGet = new HttpGet("http://quote.yahoo.com/d/quotes.csv?s=" + currencyFrom + currencyTo + "=X&f=l1&e=.csv"); 
 ResponseHandler responseHandler = new BasicResponseHandler();   
 String responseBody = httpclient.execute(httpGet, responseHandler);    
 httpclient.getConnectionManager().shutdown();    
 return Float.parseFloat(responseBody);   
 }    
public void convertToRs()
{String to = null;
 String amnt=JOptionPane.showInputDialog(null, "Any to rupee..","$");
 //if ("$".charAt(0).(();
 if(amnt.substring(0,1).compareTo("$")==0)
        to="USD";
 
 if(amnt.substring(0,1).compareTo("E")==0)
        to="EUR";
 double ghh=1;
 try{
       ghh=Double.parseDouble(amnt.substring(1));
 }catch (Exception e){}  
 YahooCurrencyConverter df= new YahooCurrencyConverter();
 try {
  float x=df.convert(to,"INR");
  new popMe( "Exchange rate is"+x,"From  "+to+" to INR", "exp", 6, 125);
  
  JOptionPane.showMessageDialog(null,x*ghh);
 } catch (IOException e) {
  // TODO Auto-generated catch block
  e.printStackTrace();
 }
 }
}


JFrame that pops-up from the taskbar like notifications.

Here i have given the JAVA code to make a popup that happens exactly like the gmail desktop application does.It uses a JFrame to make the window.

Code:
package com.oksbwn.popUp;
import java.awt.*;
import java.awt.event.*;

import javax.swing.*;

import com.oksbwn.ErrorHandling.handleExceptions;

import resources.RscLoader;

public class popMe extends JFrame {
 private static final long serialVersionUID = 1L;
 public static void main(String[] args) throws Exception{
   new popMe("hi", "from Bikash", "ok",15, 125);
  }
public popMe(String message,String header,String image, final int time,int height) 
       {

 Runnable r = new newThreadPop(message,header,image,time,height);
 new Thread(r).start();
       }
 }
 
class newThreadPop implements Runnable {
 private String message;
 private String header;
 private String image;
 private  int time;
 private  int height;

  public newThreadPop(String message1,String header1,String image1, final int time1,int height1) {
         // store parameter for later user
   this.message=message1;
   this.header=header1;
   this.image=image1;
   this.time=time1;
   this.height=height1;
     }

     public void run() {
    final Runnable runnable = (Runnable) Toolkit.getDefaultToolkit().getDesktopProperty("win.sound.exclamation");
    //default 
     if (runnable != null)
       runnable.run();
  final JFrame frame = new JFrame();
  frame.setUndecorated(true);
  frame.setType(javax.swing.JFrame.Type.UTILITY);frame.setUndecorated(true);
     frame. setBackground(new Color(Color.black.getRed(), Color.black.getGreen(),Color.black.getBlue(),0));
  ((JComponent)frame.getContentPane()).setBorder(    
          BorderFactory.createMatteBorder( 2, 2, 2, 2, Color.black ) );
  frame.setSize(300,height);
  frame.setLayout(new GridBagLayout());
  GridBagConstraints constraints = new GridBagConstraints();
  constraints.gridx = 0;
  constraints.gridy = 0;
  constraints.weightx = 1.0f;
  constraints.weighty = 1.0f;
  constraints.insets = new Insets(5, 5, 5, 5);
  constraints.fill = GridBagConstraints.BOTH;
  JLabel headingLabel = new JLabel(header);
  headingLabel.setForeground(Color.red);
  ImageIcon headingIcon = new ImageIcon(RscLoader.getImage(image)); 
  headingLabel .setIcon(headingIcon); // --- use image icon you want to be as heading image.
  headingLabel.setOpaque(false);
  frame.add(headingLabel, constraints);
  constraints.gridx++;
  constraints.weightx = 0f;
  constraints.weighty = 0f;
  constraints.fill = GridBagConstraints.NONE;
  constraints.anchor = GridBagConstraints.NORTH;
  
  final JLabel lblX = new JLabel("X");
  lblX.setToolTipText("Close\r\n");
  lblX.addMouseListener(new MouseAdapter() {
   @Override
   public void mouseClicked(MouseEvent arg0) {
    frame.dispose();
   }
   @Override
   public void mouseEntered(MouseEvent e) {
    lblX.setForeground(new Color(255, 0, 0));
   }
   public void mouseExited(MouseEvent e) {
    lblX.setForeground(new Color(0, 0, 0));
   }
  });
  lblX.setSize(10,10);
  lblX.setFocusable(false);
  frame.add(lblX,constraints);
  constraints.gridx = 0;
  constraints.gridy++;
  constraints.weightx = 1.0f;
  constraints.weighty = 1.0f;
  constraints.insets = new Insets(5, 5, 5, 5);
  constraints.fill = GridBagConstraints.BOTH;
  JLabel messageLabel = new JLabel(""+message);
  messageLabel.setForeground(Color.blue);
  frame.add(messageLabel, constraints);
  frame.setDefaultCloseOperation(WindowConstants.EXIT_ON_CLOSE);
  frame.setVisible(true);
  frame.setAlwaysOnTop(true);
  Dimension scrSize = Toolkit.getDefaultToolkit().getScreenSize();// size of the screen  
        Insets toolHeight = Toolkit.getDefaultToolkit().getScreenInsets(frame.getGraphicsConfiguration());// height of the task bar  
        frame.setLocation(scrSize.width - frame.getWidth(), scrSize.height - toolHeight.bottom - frame.getHeight()); 
                new Thread(){  
           @Override 
            public void run() {  
                  try {  
                   Thread.sleep(time*1000); // time after which pop up will be disappeared.  
                      frame.dispose();  
                      }
                  catch (Exception e)
                  {new handleExceptions(e);} };}.start(); 

 }
}


A Transparent screen to lock the Desktop.

In this code i am sharing the code to lock the PC screen by using a transparent JFrame so as to restrict others to use it.The frame disappears  only when the user enters the right username and password.This enables the user to let the background tasks going on and lock the screen.This has the only problem that it can be closed by the task manager.If you find a solution to it please let me know.

Code:

package com.oksbwn.systeminteraction;

import java.awt.Color;
import java.awt.Dimension;
import java.awt.Toolkit;
import java.awt.event.KeyAdapter;
import java.awt.event.KeyEvent;
import java.awt.event.MouseAdapter;
import java.awt.event.MouseEvent;
import java.io.IOException;

import javax.microedition.io.Connection;
import javax.microedition.io.Connector;
import javax.swing.BorderFactory;
import javax.swing.JButton;
import javax.swing.JComponent;
import javax.swing.JFrame;
import javax.swing.JLabel;
import javax.swing.JPasswordField;
import javax.swing.JTextField;

import com.oksbwn.popUp.popMe;
import com.oksbwn.voiceEnable.Voice;

public class Hibernate
{
   JFrame frame2=new JFrame();
//public static void main(String args[]) throws Exception
 public void doit() throws IOException
    {
 try {
        Connection connection = Connector.open( "btgoep://" +"04A82A5A62FB" + ":9");
           connection.close();
  //int x=1/0;//The condition which will trigger the frame to come up
       } 
    catch (Exception e) {
     //r.exec("shutdown -h");//s for shutdown r restart
 // Runtime rt = Runtime.getRuntime();
    // rt.exec("C:\\Windows\\System32\\rundll32.exe user32.dll,LockWorkStation");
     
     Dimension scrSize = Toolkit.getDefaultToolkit().getScreenSize();// size of the screen
   frame2.setBounds(0,0,scrSize.width, scrSize.height);
     frame2.getContentPane().setLayout(null);
     frame2.setAlwaysOnTop(true);
     frame2.setUndecorated(true);
      frame2.setBackground(new Color(Color.black.getRed(), Color.black.getGreen(),Color.black.getBlue(),1));
      frame2.getContentPane().setBackground(new Color(Color.black.getRed(), Color.black.getGreen(),Color.black.getBlue(),50));
     ((JComponent)frame2.getContentPane()).setBorder(    
              BorderFactory.createMatteBorder( 2, 2, 2, 2, Color.black ) );
     frame2.setType(javax.swing.JFrame.Type.UTILITY);
     frame2.setAlwaysOnTop(true);
     
     final JTextField textField = new JTextField();
     textField.addKeyListener(new KeyAdapter() {
     @Override
     public void keyPressed(KeyEvent arg0) { 
       frame2.repaint();
     }
    });
     textField.setBounds(scrSize.width-150, scrSize.height-100, 140, 30);
     textField.setBackground(new Color(Color.black.getRed(), Color.black.getGreen(),Color.black.getBlue(),1));
     frame2.getContentPane().add(textField);
     textField.setColumns(10);
   
     final JPasswordField passwordField = new JPasswordField();
     passwordField.addKeyListener(new KeyAdapter() {
     @Override
     public void keyPressed(KeyEvent arg0) { 
       frame2.repaint();
     }
    });
     frame2.setDefaultCloseOperation(JFrame.DO_NOTHING_ON_CLOSE);
     passwordField.setBounds(scrSize.width-150, scrSize.height-65,140,30);
     passwordField.setBackground(new Color(Color.black.getRed(), Color.black.getGreen(),Color.black.getBlue(),1));
     frame2.getContentPane().add(passwordField);
     
    JButton btnLogIn = new JButton("login");
    btnLogIn.setBounds(scrSize.width-127,scrSize.height-30,77,24);
       frame2.getContentPane().add(btnLogIn);
        btnLogIn.addMouseListener(new MouseAdapter() {
     @Override
     public void mouseClicked(MouseEvent arg0) 
     {
      @SuppressWarnings("deprecation")
      String pass=passwordField.getText();
      logClicked(pass,textField.getText());
      passwordField.setText(null);
      textField.setText(null);
      //frame2.dispose();
     }
    });
     
        final JLabel Snap = new JLabel();
           Snap.setForeground(Color.RED);
           Snap.setBounds(scrSize.width/2-100, scrSize.height/2-100,200,200);
     frame2.getContentPane().add(Snap);
     
     frame2.addMouseListener(new MouseAdapter() {
       @Override
       public void mouseClicked(MouseEvent arg0) {
     final Runnable runnable = (Runnable) Toolkit.getDefaultToolkit().getDesktopProperty("win.sound.exclamation");
     //default 
      if (runnable != null)
        runnable.run();
      Snap.setText("OOOOps   You are Not Bikash");
         }
     });
     frame2.setVisible(true);
     }
    }
protected  void logClicked(String pass, String user) 
{
 String aPass="******";//Password
 String aUser="oksbwn";//Username
 if (aPass.compareTo(pass) == aUser.compareTo(user)==true)
    {
   //sucess message
  }
 else {
     //failure message
      }
 }
}

Drive space usage information in JAVA

This JAVA code gives the dpace usage by the 'c:' drive you can modify it for others.

Code:

package com.oksbwn.systeminteraction;
import java.io.File;
public class DiskSpaceDetail
{
 public String FreeSpaceInDrive()
    { 
  String space="";
     File file = new File("C:");
     long totalSpace = file.getTotalSpace(); //total disk space in bytes.
     long usableSpace = file.getUsableSpace(); ///unallocated / free disk space in bytes.
      space=space+"C:";
     space="T:  "+ totalSpace /1024 /1024 + " MB  F: "+ usableSpace /1024 /1024+" MB";
     return space;
     }
 }

Taking a snap of the Desktop in JAVA

Here i have gioven the code to take a snap of the desktop using JAVA.Hope you will use it in your own way.

Code:
package com.oksbwn.systeminteraction;
import java.awt.Color;
import java.awt.Dimension;
import java.awt.MouseInfo;
import java.awt.Point;
import java.awt.Rectangle;
import java.awt.Robot;
import java.awt.Toolkit;
import java.awt.event.MouseAdapter;
import java.awt.event.MouseEvent;
import java.awt.image.BufferedImage;
import java.io.File;

import javax.imageio.ImageIO;
import javax.swing.*;

import resources.RscLoader;

import com.oksbwn.ErrorHandling.handleExceptions;
import com.oksbwn.popUp.popMe;
public class CaptureScreen {
 static JFrame frame2=new JFrame();
 static Point p;
 static Point R;
 static Point D;
 static int Finaly;
 static int Startx;
 static int Starty;
 static int Finalx;
 static JTextField jt=new JTextField();
  public static void main(String[] args) 
  {
   CaptureScreen cS=new CaptureScreen();
   cS.SnapTaker();
  }
 public void SnapTaker()
   {
    Dimension scrSize = Toolkit.getDefaultToolkit().getScreenSize();// size of the screen
  frame2.setBounds(0,0,scrSize.width, scrSize.height);
    frame2.getContentPane().setLayout(null);
    frame2.setAlwaysOnTop(true);
    frame2.setUndecorated(true);
     frame2.setBackground(new Color(Color.black.getRed(), Color.black.getGreen(),Color.black.getBlue(),1));
     frame2.getContentPane().setBackground(new Color(Color.black.getRed(), Color.black.getGreen(),Color.black.getBlue(),50));
    ((JComponent)frame2.getContentPane()).setBorder(    
             BorderFactory.createMatteBorder( 2, 2, 2, 2, Color.black ) );
    frame2.setType(javax.swing.JFrame.Type.UTILITY);
    frame2.setAlwaysOnTop(true);
    
    jt.setBounds(0,0,0,0);
    jt.addMouseListener(mouseListener);
    jt.setBorder(BorderFactory.createMatteBorder( 2, 2, 2, 2, Color.black ));
    jt.addMouseMotionListener(mouseListener);
    jt.setEditable(false);
     jt.setBackground(new Color(Color.black.getRed(), Color.black.getGreen(),Color.black.getBlue(),0));
    frame2.getContentPane().add(jt);
    
          final JLabel cloesButton = new JLabel("X");
    cloesButton.setForeground(Color.white);
    cloesButton.setToolTipText("Close");
    cloesButton.addMouseListener(new MouseAdapter() {
       @Override
       public void mouseClicked(MouseEvent arg0) {
         frame2.dispose();
         }
      @Override
      public void mouseEntered(MouseEvent arg0) {
        cloesButton.setForeground(Color.red);
       }
     @Override
      public void mouseExited(MouseEvent arg0) {
        cloesButton.setForeground(Color.white);
       }});
    cloesButton.setSize(15,15);
    cloesButton.setBounds(scrSize.width-15, scrSize.height-20,15,20);
    
          final JLabel Snap = new JLabel();
          Snap.setIcon(new ImageIcon(RscLoader.getImage("cam")));
          Snap.setForeground(Color.white);
          Snap.setToolTipText("Take Snap");
          Snap.addMouseListener(new MouseAdapter() {
       @Override
       public void mouseClicked(MouseEvent arg0) {
         takeSnap();
         }
      @Override
      public void mouseEntered(MouseEvent arg0) {
       Snap.setForeground(Color.GREEN);
       }
     @Override
      public void mouseExited(MouseEvent arg0) {
      Snap.setForeground(Color.white);
       }});
          Snap.setBounds(scrSize.width-100, scrSize.height-20,60,20);
    frame2.getContentPane().add(Snap);
    
    frame2.addMouseListener(new MouseAdapter() {
     
      @Override
      public void mousePressed(MouseEvent arg0) {
        p= MouseInfo.getPointerInfo().getLocation();
         //jt.setBounds(0,0,p.x,p.y);
       }
      @Override
      public void mouseReleased(MouseEvent arg0) {
        R= MouseInfo.getPointerInfo().getLocation();
           jt.setBounds(p.x,p.y,R.x-p.x,R.y-p.y);
       }});
    frame2.getContentPane().add(cloesButton);
    frame2.setVisible(true);

  }
  private final static void takeSnap()
  {
    try {
       Robot robot = new Robot();       
       Rectangle area = new Rectangle(jt.getBounds());
       BufferedImage bufferedImage = robot.createScreenCapture(area);
       File file = new File("C:\\users\\oksbwn\\desktop\\screenshot_small.png");
       boolean i=ImageIO.write(bufferedImage, "jpg", file);
       if (i)
       {
        new popMe("Snap taken Sucessfully.","Screen Capture","ok",2,125);
       }
    } catch (Exception e) {new handleExceptions(e);}
  }
  private final static MouseAdapter mouseListener = new MouseAdapter() {
      int x, y;
      @Override
      public void mousePressed(MouseEvent e) {
          if (e.getButton() == MouseEvent.BUTTON1) {
              x = e.getX();
              y = e.getY();
          }
      }

      @Override
      public void mouseDragged(MouseEvent e) {
          if ((e.getModifiersEx() & MouseEvent.BUTTON1_DOWN_MASK) != 0) {
           jt. setLocation(e.getXOnScreen() - x, e.getYOnScreen() - y);
          }
      }
  };
  
}

PC Login Duration in JAVA

This code snippest is about getting the time duration from which the user has been logged in using JAVA.

 code:

package com.oksbwn.systeminteraction;
import java.io.BufferedReader;
import java.io.InputStreamReader;
import java.text.SimpleDateFormat;
import java.util.Date;
public class OsLoginTime {
 public static long getSystemUptime() throws Exception {
  long uptime =0000;
  
      Process uptimeProc = Runtime.getRuntime().exec("net stats srv");
      BufferedReader in = new BufferedReader(new InputStreamReader(uptimeProc.getInputStream()));
      String line;
      while ((line = in.readLine()) != null) {
          if (line.startsWith("Statistics since")) {
              SimpleDateFormat format = new SimpleDateFormat("'Statistics since' MM/dd/yyyy hh:mm:ss a");
              Date boottime = format.parse(line);
              uptime = System.currentTimeMillis() - boottime.getTime();
              break;
         }
  }
  return uptime/36000;//in millisecond
  }
}

Get own IP address in JAVA

This is a code snippest to get the current IP address of own system.

code:
package com.oksbwn.systeminteraction;
import java.net.InetAddress;
import java.net.UnknownHostException;
 
public class IpAdress{
 
  //public static void main(String[] args){
public static InetAddress getIP(){
 InetAddress ip;
 try {ip = InetAddress.getLocalHost();
  return ip;
  } catch (UnknownHostException e) {e.printStackTrace();}
 return null;
 
 }
 
   }


Draggable Transparent JFrame in JAVA

Here i am going to post about a JFrame that is transparent ,having a close button and is draggable.The JAVA code is given below.

Code:
public class transparentJFrame {
 public static void main(String[] args)
 {
    new transparentJFrame(Date,Head,Detal);
     }
public transparentJFrame(String Date,String Head,String Detal) 
     {  
  
  JFrame frame = new JFrame();
  frame.setUndecorated(true);
  frame.setBackground(new Color(Color.black.getRed(), Color.black.getGreen(),Color.black.getBlue(),1));
  //Change value of '1' above to have diff transparency
    ((JComponent)frame.getContentPane()).setBorder(    
           BorderFactory.createMatteBorder( 3, 2, 2, 2, Color.black));
  frame.setBounds(100, 50, 500, 400);
  frame.getContentPane().setLayout(null);
  
   final JLabel lblX = new JLabel("X");
   lblX.setBounds(frame.getWidth()-15,5,15,15);
   lblX.setForeground(new Color(255, 255,255));
   lblX.setToolTipText("Close\r\n");
   lblX.addMouseListener(new MouseAdapter() {
   @Override
   public void mouseClicked(MouseEvent arg0) {
    frame.dispose();
   }
   @Override
   public void mouseEntered(MouseEvent e) {
    lblX.setForeground(new Color(255, 0, 0));
   }
   public void mouseExited(MouseEvent e) {
    lblX.setForeground(new Color(255, 255,255));
   }
  });
  lblX.setFocusable(false); 
  frame.getContentPane().add(lblX);
  frame.setVisible(true);
 }
}


Thursday, December 5, 2013

Clickable image gallery using JAVA

This is a sample project that gives the user a simple image gallery of 44 images those are clickable and prints the clicked image names to the prompt .This can be used as menu or any other way.Hope you would like it.

Code:
MainFrame.java

import java.awt.*;
public class JIFrameDemo{
 static createFrame f1=new createFrame();
 static createFrame f2=new createFrame();
 
 static createFrame f3=new createFrame();
 static createFrame f4=new createFrame();
 static createFrame f5=new createFrame();
 static createFrame f6=new createFrame();
 static createFrame f7=new createFrame();
 static createFrame f8=new createFrame();
 static createFrame f9=new createFrame();

 static createFrame f10=new createFrame();
 static createFrame f11=new createFrame();
 static createFrame f12=new createFrame();
 static  createFrame f13=new createFrame();
 static createFrame f14=new createFrame();
 static createFrame f15=new createFrame();
 static createFrame f16=new createFrame();
 static createFrame f17=new createFrame();
 static createFrame f18=new createFrame();
 
 static createFrame f19=new createFrame();
 static createFrame f20=new createFrame();
 static createFrame f21=new createFrame();
 static createFrame f22=new createFrame();
 static createFrame f23=new createFrame();
 static createFrame f24=new createFrame();
 static createFrame f25=new createFrame();
 static createFrame f26=new createFrame();
 static createFrame f27=new createFrame();

 static createFrame f28=new createFrame();
 static createFrame f29=new createFrame();
 static createFrame f30=new createFrame();
 static  createFrame f31=new createFrame();
 static createFrame f32=new createFrame();
 static createFrame f33=new createFrame();
 static createFrame f34=new createFrame();
 static createFrame f35=new createFrame();
 static createFrame f36=new createFrame();
 
 static createFrame f37=new createFrame();
 static createFrame f38=new createFrame();
 static  createFrame f39=new createFrame();
 static createFrame f40=new createFrame();
 static createFrame f41=new createFrame();
 static createFrame f42=new createFrame();
 static createFrame f43=new createFrame();
 static createFrame f44=new createFrame();
 static lastframe f45=new lastframe();
 String std="f45";
 public static void main(String[] args) {
  Dimension gh=java.awt.Toolkit.getDefaultToolkit().getScreenSize();
  int i=0,j=0;
  f1.frame(20,20,"samosa");
  f18.frame(900,130,"aloo_bharta");
  f17.frame(790,130,"vada 3");
  f16.frame(680,130,"tea");
  f15.frame(570,130,"roti");
  f14.frame(460,130,"rice");
  f3.frame(240,20,"biscuit");f2.frame(130,20,"aluchup");
  f13.frame(350,130,"puri");
  f12.frame(240,130,"paratha");
  f11.frame(130,130,"paneer_masala");
  f10.frame(20,130,"mudhi");
  f9.frame(900,20,"mixture");
  f8.frame(790,20,"dosa");
  f7.frame(680,20,"dal");
  f6.frame(570,20,"cold_drink");
  f5.frame(460,20,"cofee");
  f4.frame(350,20,"chowmin");

  f44.frame(790,460,"1");
  f43.frame(680,460,"1");
  f42.frame(570,460,"1");
  f41.frame(460,460,"1");
  f40.frame(350,460,"1");
  f39.frame(240,460,"1");
  f38.frame(130,460,"1");
  f37.frame(20,460,"1");
  f36.frame(900,350,"1");
  f35.frame(790,350,"1");
  f34.frame(680,350,"1");
  f33.frame(570,350,"tomatto_khatta");
  f32.frame(460,350,"alu_beans");
  f31.frame(350,350,"alu_potal");
  f30.frame(240,350,"dahi_baigan");
  f29.frame(130,350,"saga");
  f28.frame(20,350,"salad");
  f27.frame(900,240,"ghnta_curry_fry");
  f26.frame(790,240,"dalma");
  f25.frame(680,240,"ghanta_curry_masala");
  f24.frame(570,240,"gaja_muga");
  f23.frame(460,240,"chilly_paneer");
  f22.frame(350,240,"dahi_salad");
  f21.frame(240,240,"dahi");
  f20.frame(130,240,"baigan_bharta");
  f19.frame(20,240,"alu_govi");
  f45.frame(900,460);
 }
 void allDispose()
  {
  f1.dispose().dispose();
  f2.dispose().dispose();
  f3.dispose().dispose();
  f4.dispose().dispose();
  f5.dispose().dispose();
  f6.dispose().dispose();
  f7.dispose().dispose();
  f8.dispose().dispose();
  f9.dispose().dispose();
  f10.dispose().dispose();
  f11.dispose().dispose();
  f12.dispose().dispose();
  f13.dispose().dispose();
  f14.dispose().dispose();
  f15.dispose().dispose();
  f16.dispose().dispose();
  f17.dispose().dispose();
  f18.dispose().dispose();
  f19.dispose().dispose();
  f20.dispose().dispose();
  f21.dispose().dispose();
  f22.dispose().dispose();
  f23.dispose().dispose();
  f24.dispose().dispose();
  f25.dispose().dispose();
  f26.dispose().dispose();
  f27.dispose().dispose();
  f28.dispose().dispose();
  f29.dispose().dispose();
  f30.dispose().dispose();
  f31.dispose().dispose();
  f32.dispose().dispose();
  f33.dispose().dispose();
  f34.dispose().dispose();
  f35.dispose().dispose();
  f36.dispose().dispose();
  f37.dispose().dispose();
  f38.dispose().dispose();
  f39.dispose().dispose();
  f40.dispose().dispose();
  f41.dispose().dispose();
  f42.dispose().dispose();
  f43.dispose().dispose();
  f44.dispose().dispose();
  f45.dispose().dispose();
  
  
  }
}
Createframe.java//To create small frames
 
import java.awt.Color;
import java.awt.event.MouseAdapter;
import java.awt.event.MouseEvent;

import javax.swing.BorderFactory;
import javax.swing.JComponent;
import javax.swing.JDesktopPane;
import javax.swing.JFrame;
import javax.swing.JLabel;


public class createFrame {
    final JFrame jf = new JFrame("JIFrameDemo Main Window");
	public JFrame dispose(){
		return jf;
	}
	public void frame(int xPos,int yPos,final String img){
    jf.setUndecorated(true);
    jf.setBackground(new Color(Color.black.getRed(), Color.black.getGreen(),Color.black.getBlue(),0));
    jf.setSize(100,100);
    jf.setLocation(xPos, yPos);
    JDesktopPane dtp = new JDesktopPane();
    dtp. setBackground(new Color(Color.black.getRed(), Color.black.getGreen(),Color.black.getBlue(),100));
   // dtp.setBackground(Color.GREEN);
    jf.setContentPane(dtp);  
    jf.setType(javax.swing.JFrame.Type.UTILITY);
    
	((JComponent)jf.getContentPane()).setBorder(    
	        BorderFactory.createMatteBorder( 2, 2, 2, 2, Color.black ) );
	
	final JLabel lblX = new JLabel("X");
	lblX.setLocation(89,5);
	lblX.setForeground(new Color(255, 255,255));
	lblX.setToolTipText("Close\r\n");
	lblX.addMouseListener(new MouseAdapter() {
		@Override
		public void mouseClicked(MouseEvent arg0) {
			jf.dispose();
		}
		@Override
		public void mouseEntered(MouseEvent e) {
			lblX.setForeground(new Color(255, 0, 0));
		}
		public void mouseExited(MouseEvent e) {
			lblX.setForeground(new Color(255, 255,255));
		}
	});
	lblX.setSize(10,10);
	lblX.setFocusable(false);	
	jf.add(lblX);
	
	final JLabel lblX1 = new JLabel("");
	lblX1.setLocation(0,0);
	lblX1.setForeground(new Color(255, 255,255));
	final addFood fd=new addFood();
	lblX1.addMouseListener(new MouseAdapter() {
		@Override
		public void mouseClicked(MouseEvent e) 
		{
			//jf.getName();
			//System.out.println(img);
			String list;
			String bef=fd.returnlast();
			if (bef=="")
				list=bef+""+img;
			else 
			  {
				list=bef+","+img;
			  }
			fd.addnew(list);
		}
	});
	lblX1.setSize(110,110);
	lblX1.setToolTipText(img);
	lblX1.setFocusable(false);
	jf.add(lblX1);
    jf.setVisible(true);
    }
}
LastFrame.java//Added to close all the opened frames when clicked.
import java.awt.Color;
import java.awt.event.MouseAdapter;
import java.awt.event.MouseEvent;

import javax.swing.BorderFactory;
import javax.swing.JComponent;
import javax.swing.JDesktopPane;
import javax.swing.JFrame;
import javax.swing.JLabel;


public class lastframe {

    final JFrame jf = new JFrame("JIFrameDemo Main Window");
	public JFrame dispose(){
	return jf;
}
	public void frame(int xPos,int yPos){
    jf.setUndecorated(true);
    jf.setBackground(new Color(Color.black.getRed(), Color.black.getGreen(),Color.black.getBlue(),0));
    jf.setSize(100,100);
    jf.setLocation(xPos, yPos);
    JDesktopPane dtp = new JDesktopPane();
    dtp. setBackground(new Color(Color.black.getRed(), Color.black.getGreen(),Color.black.getBlue(),100));
   // dtp.setBackground(Color.GREEN);
    jf.setContentPane(dtp);  
    jf.setType(javax.swing.JFrame.Type.UTILITY);
    
	((JComponent)jf.getContentPane()).setBorder(    
	        BorderFactory.createMatteBorder( 2, 2, 2, 2, Color.black ) );
	
	final JLabel lblX = new JLabel("X");
	lblX.setLocation(89,5);
	lblX.setForeground(new Color(255, 255,255));
	lblX.setToolTipText("Close\r\n");
	lblX.addMouseListener(new MouseAdapter() {
		@Override
		public void mouseClicked(MouseEvent arg0) {
			jf.dispose();
		}
		@Override
		public void mouseEntered(MouseEvent e) {
			lblX.setForeground(new Color(255, 0, 0));
		}
		public void mouseExited(MouseEvent e) {
			lblX.setForeground(new Color(255, 255,255));
		}
	});
	lblX.setSize(10,10);
	lblX.setFocusable(false);	
	jf.add(lblX);
	
	final JLabel lblX1 = new JLabel("");
	lblX1.setLocation(0,0);
	lblX1.setForeground(new Color(255, 255,255));
	lblX1.addMouseListener(new MouseAdapter() {
		@Override
		public void mouseClicked(MouseEvent e) 
		{
			//jf.getName();
			System.out.println("completed");
			JIFrameDemo xy=new JIFrameDemo();
			xy.allDispose();
		}
	});
	lblX1.setSize(110,110);
	lblX1.setToolTipText("Completed");
	lblX1.setFocusable(false);
	jf.add(lblX1);
    jf.setVisible(true);
    }
}
addFood.java//To make a string of clicked images
 

public class addFood { 
	static String before="" ;
	public String returnlast(){
		return before;
	}
public void addnew(String food)
    {
	  before=food;
	  System.out.println(before);
	}
}